
I’ve watched people get that look on their face. The one where they already know the answer isn’t good.
They’d forgotten their Apple Account password. They didn’t have a recovery method set up. And everything — photos, files, purchases — was just gone. Not stolen. Locked away forever.
I never want you to feel that. So let’s make sure it never happens to you.
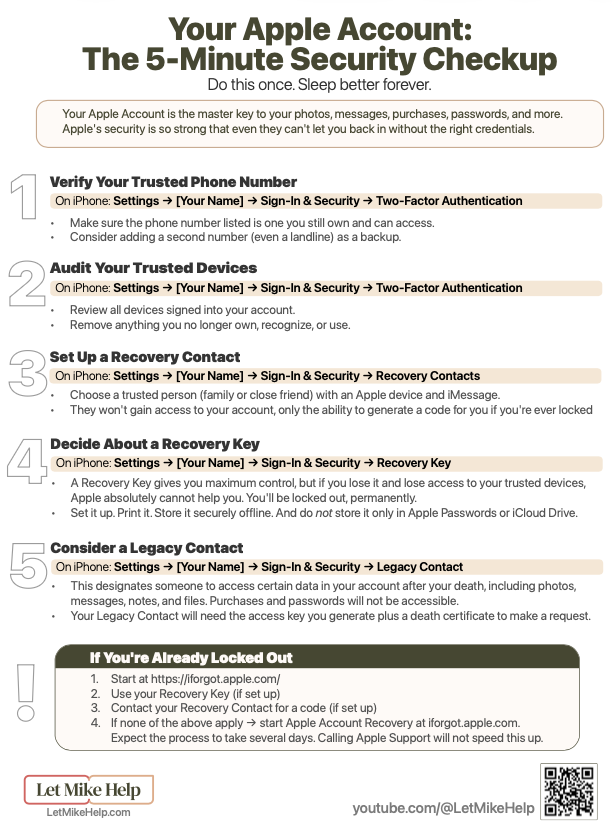
Download: Apple Account Password One-Pager
What’s actually at stake
Your Apple Account isn’t just a login — it’s the master key to your entire Apple ecosystem. It’s where these things live:
- iCloud Photos
- iMessages
- Notes & Files
- App purchases and subscriptions
- Passwords
- Mobile device backups
- Find My and Apple Pay
If you lose access, you’re blocked from all of it. And Apple takes security seriously enough that even they can’t let you back in without the right credentials.
That’s by design. That’s good. But only if you’re prepared.
Your first lines of defense
Keep track of your Apple Account password
Don’t take this one lightly. I’ve seen the heartache firsthand — people in tears, with nothing anyone could do to help. That stuck with me.
If you use Apple Passwords as your password manager, store your Apple Account password somewhere outside of it. Here’s why that matters: if you’re locked out of your Apple Account, you’re also locked out of Apple Passwords. Mine lives in 1Password, where I can access it independently of my Apple Account.
Two-factor authentication
Apple enables two-factor authentication by default across the devices you’re logged into. When you sign in from a new device, a verification code appears on your other trusted devices — iPhone, iPad, Mac, or Apple Watch (when it’s connected to your iPhone or to cellular).
Here’s how to review your trusted phone numbers and devices:
- Open Settings
- Tap your name (Apple Account)
- Go to Sign-In & Security
- Tap Two-Factor Authentication
- Review your list of trusted devices and trusted phone numbers
- Tap Add Trusted Phone Number to add a backup number
I strongly recommend having a secondary phone number on file that isn’t your iPhone — another cell phone, or even a landline that can take a voice call. If your iPhone is your only trusted device and it’s missing, Apple can call that next trusted number instead. Being able to reach someone for that code, when you’re out and locked out, is priceless.
Your recovery options
I’ll be honest — there have been a few moments in my own life where I’ve felt the panic. Maybe not a full lockout, but enough of a scare while changing a password that I know the feeling in your chest when you’re not sure you’re getting back in. Here’s what to set up before that happens.
Recovery Key
This is my personal recommendation. It’s a 28-character code that acts as your override key.
How to set it up:
- Open Settings → [your name] → Sign-In & Security
- Tap Recovery Key
- Follow the prompts to create and save your key
A few important notes:
- Save the key outside of your Apple Account. Do not store it in Apple Passwords — remember, locked out of your Apple Account means locked out of Apple Passwords too.
- You can also print your Recovery Key and store it somewhere secure. If you’re putting it in a fireproof safe, put it in a baggie first. Fireproof safes are not waterproof — I had a dear friend whose home burned down, and fire hose water filled her “fireproof” safe and ruined the documents inside.
- Personally, I keep my Recovery Key in a fireproof safe (in a baggie) and in my 1Password account. (I have a separate video on password managers if you want to go deeper on that setup.)
Take this seriously: if you lose your Recovery Key and your trusted devices are unavailable, you are permanently locked out. Apple truly cannot help you recover the account at that point. I’ve seen real people experience this. It’s not theoretical.
Recovery Contact
A Recovery Contact is a trusted person who can help you back into your account if you’re locked out. They need to be 13 or older, own an Apple device, and have iMessage enabled.
How to set it up:
- Open Settings → [your name] → Sign-In & Security
- Tap Recovery Contacts
- Tap Add Recovery Contact and choose someone you trust
When you actually need their help, reach out to them directly — in person or by phone — and have them go to their own Settings → [their name] → Sign-In & Security → Account Recovery. Your name will appear under “Account Recovery For.” They tap your name and generate a recovery code, which they then share with you.
If you’re already locked out
Start at iforgot.apple.com. Follow the prompts — it will walk you through your available options, which may include:
- Recovery Key, if you set one up
- Recovery Contact, if you set one up
- Apple Account Recovery process, if neither of the above is available
If you didn’t set up a Recovery Key, know that the standard recovery process takes time. You’ll get a confirmation email within about 72 hours that includes an estimated time of arrival for resolution. Apple verifies your identity using your account history, trusted phone numbers, and prior login data. There’s no way to speed this up — even calling Apple Support won’t expedite it.
You can learn more directly from Apple here: Apple Account Recovery.
And again — if your Recovery Key is lost and your trusted devices aren’t working, there’s no way forward, not even through the standard recovery process.
Your 5-minute checkup, right now
Before you move on, run through this list:
- Verify your trusted phone number is current
- Audit your trusted devices — remove anything you no longer own
- Decide whether a Recovery Key is right for you, and if so, store it safely
- Set up at least one Recovery Contact
Five minutes now could save everything you’ve built in the Apple ecosystem. And honestly, it could save you from ever feeling that panic in your chest.
👉 Grab my free one-page reference guide so you can walk through this checklist without missing a step: [DOWNLOAD THE ONE-PAGER]
One more thing: Legacy Contact
This one isn’t about lockouts — it’s about planning ahead. A Legacy Contact allows someone you designate to access part of your account after you pass away. They’ll need a Legacy access key plus a death certificate, which they share with Apple. Once access is granted, it lasts three years, after which the account is deleted.
What they can access: photos, messages, notes, and files.
What they can’t access: purchases, passwords, and payment info.
How to set it up:
- Open Settings → [your name] → Sign-In & Security
- Tap Legacy Contact
- Tap Add Legacy Contact and choose someone you trust
Personally, I have my wife and children set up as Legacy Contacts — though my wife also has my account password anyway, so we’re doubly covered.
The bottom line
Your Apple Account is the foundation everything else sits on. Apple’s security is strong by design — use that to your advantage, because ignorance here can be brutal. The setup takes minutes. The peace of mind lasts a lot longer than that.
Great content! Keep up the good work!